Thursday, February 25, 2016

Honours of War - St. Ulrich Solo Game - Part 3

Turn 3 (click pictures to enlarge)
The rules require you to move your commanding general first in every game turn, up to 60 cm. It is not specified who has to do it first, though, as movement initiative is diced for in the following step. This therefore creates a dilemma as you may signal your intentions. A clever mechanic.

As an example, if the prussian CiC moves forward ahead of his infantry he discloses a  possible move forward by his troops. Why should Meyernick move forward? If his infantry also moves forward considerably, he will be in aposition to rally of one addtional hit from one of the infantry bataillons if he is within 5 cm of it. He may also remain closer to his brigadier to add his command performance bonus.

1. Move commanding generals
The Austrians make his choice easier by moving their CiC first. They stick to their plan of attack.
Meyernick thinks that a possible double move with the infantry is not a real advantage at this point. The move shown is done with the intention of encouraging his Dragoons.

The movement of the commanding generals

2. Movement Initiative: Austrians roll 5 +1 = 6 versus Prussians 4 +1 = 5 and win.

3. Movement
Maquire does not wish to show his hand at this stage and requires the Prussians to move first. He thinks he can better coordinate his attack that way.

3.1 Meyernick decides to move the dragoons. Dependable, increased to dashing due to CiC proximity. A roll of 5 or 6 allows for a double move and a charge into contact. And ... a roll of 3 results in 'Steady'. They move to the side and keep themselves out of the enemy charge range of 30 cm.

3.2 Austrian Cuirassiers: Dependable, a roll of 3 results in 'Steady'. They do not move.

3.3. Prussian Infantry: Dashing, a roll of 3 results in 'Steady'. They move forward and to the side and are outside of the field of fire of the austrian infantry.

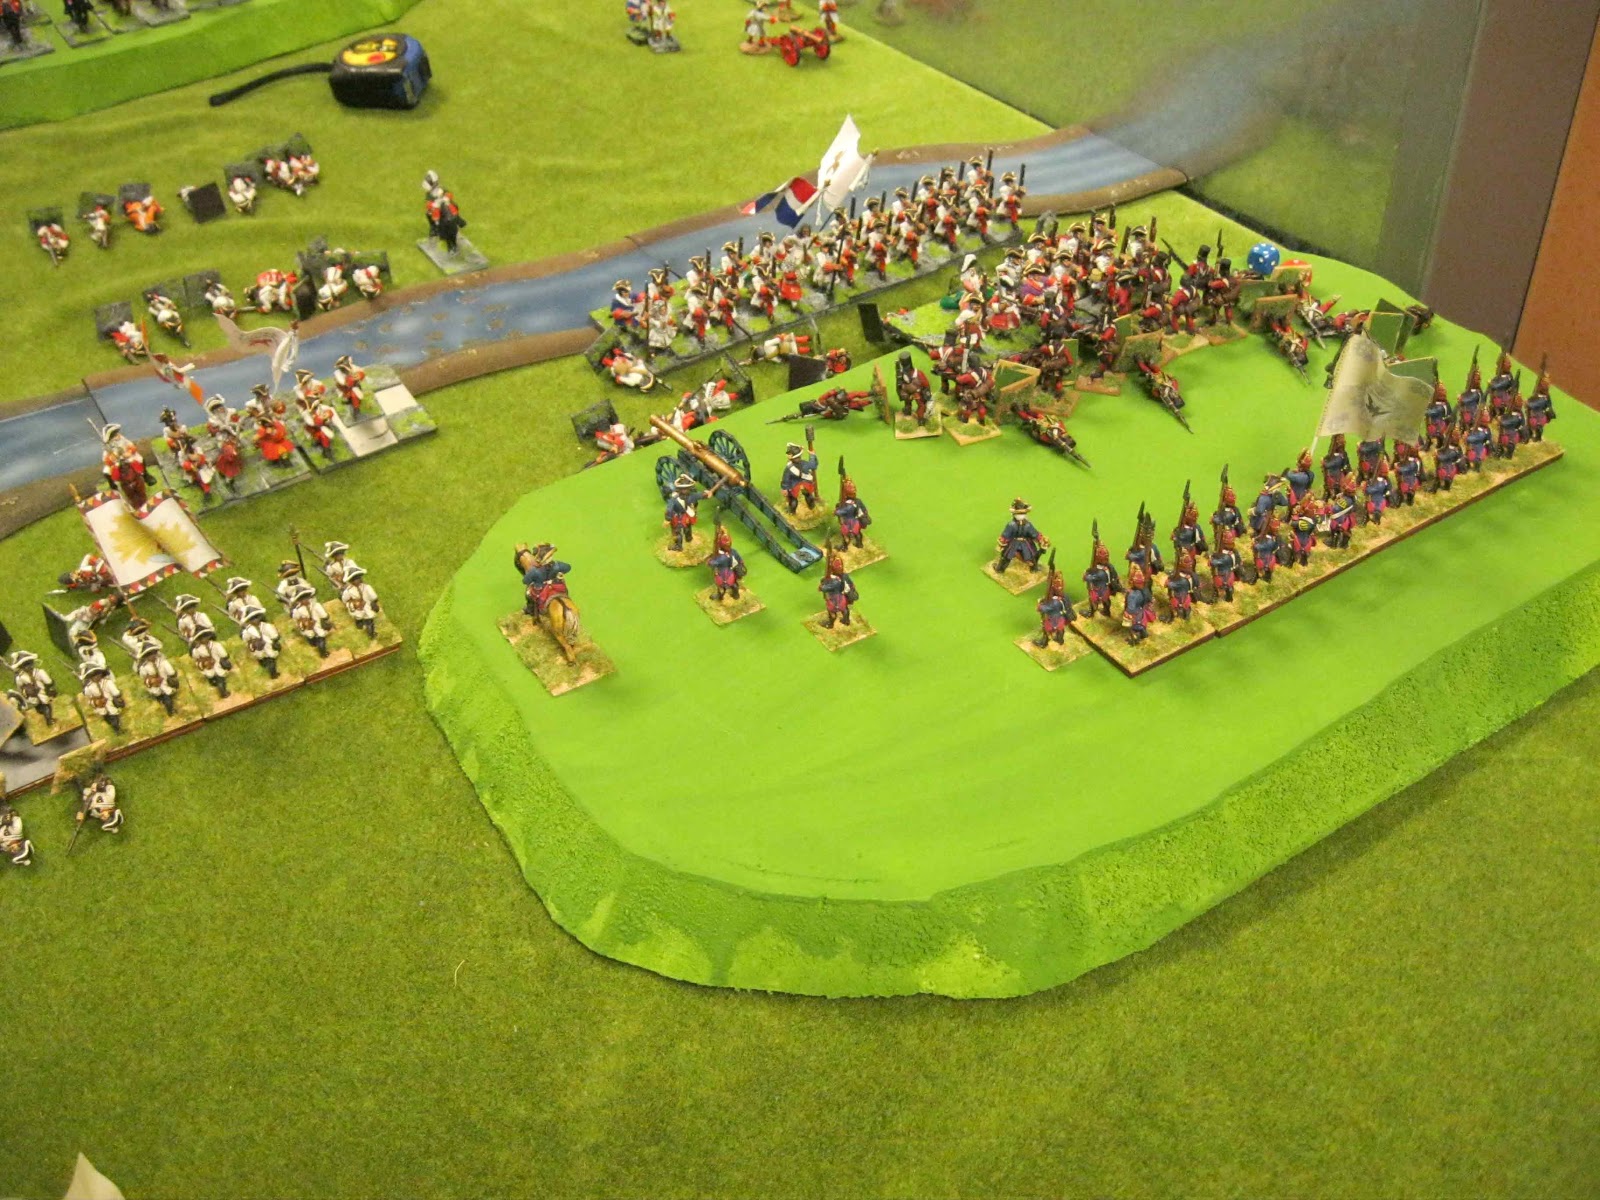
Situation after cavalry units and the prussian infantry have moved

3.4 Austrian Infantry: Dithering upgraded to Dependable due to the CiC nearby, roll of 3 results in 'Steady'. Maquire thanks the Prussians for moving their unit within cannister range and does not move the gun. The Salm-Salm infantry moves forward to be able to fire, its flank covered by II/IR Kaiser.

Turn 3 movement is done

4. Firing Initiative: Prussians win, roll of 1 +1 versus 1.

5 Firing Phase:
5.1 The prussian Brummer fires at the Salm-Salm infantry (nearest target) ..

VAABRUUUUUUUUUUUUUUUUUUM
(hear the growling thunder !!)

Standard artillery, roll of 4 -1 for long range = 3. ONE HIT ! First Blood!

Now the Combined Bataillon (no flag) also fires at Salm-Salm: Standard, moved -1, long range -1, roll of 2 -2 = ONE HIT !
II/IR 41 is out of range.

The Austrians return fire

5.2 Austrian Gun, superior, Cannister range +2, roll of 4 +2 = 6, TWO HITS, Maximum Damage!

Salm-Salm, standard, -1 long range, -1 moved, roll of 2 -2 = 0, Miss.
II/ Kaiser: standard, -1 long range, -1 moved, -1 difficult target (target unit is more than half outside the firing zone), roll of 3 -3 = 0, Miss.

Now befoe you do the 'Reaction to Firing', i.e. retreat or rout moves after all firing of both sides is resolved, you have to check for Command Casualties (rulebook p.13).

A commander within 5 cm [Edit: not 15cm, see the Amendments & Clarifications on the Honours of War website] of a unit that has received a firing hit this turn has to check. Roll 2d6 and on a 11-12 the commander is killed or wounded.
This can be easily overlooked but has serious game consequences in respect to command performance. Here we go:
  • Prussian Brigade Commander: Roll of 9.
  • Prussian Commanding General: Roll of 10. (Wow! That was close. Like Friedrich, at Kunersdorf, Meyernick seems to have a snuffbox.) [Edit: roll was not required as the CiC is more than 5 cm from the unit]
  • Austrian Brigade Commander: Roll of 10. (A bullethole in wig and tricorne for him) [Edit: roll was not required as the brigadier is more than 5 cm from the unit]
There are no Reactions to Firing as everyone is below 3 hits. 

6. Melee
7. Rally
The infantry bataillons are too close, i.e. not more the 30 cm from enemy units and both do not have a commanding general within 5 cm, who can rally of one hit from one unit automatically regardless of distance (except the last one which can never be rallied of). So ...

Two batallions, one per side, have two hits each. They are closing in on each other and the Austrians threaten to attack the Prussians in the flank and envelope them with musket fire. They have another (superior!) bataillon in reserve. The cavalry units attentively watch each other, waiting for the right moment to charge.
 
Three commanders, Meyernick, the Prussian commanding general, among them, are in the thick of the fighting and bullets and cannister whiz around them. Meyernick has to do something decisive or the Eisenfresser has to give his king a good explanation ...

Tuesday, February 23, 2016

Honours of War - St. Ulrich Solo Game - Part 2


Situation after Turn 2 movement (click picture to enlarge)

Turn 2  (turn sequence: see part 1)

Prussian CiC moves up to the brigadier. Austrian CiC does not move.

Austrians win Movement Initiative and choose to move their infantry brigade first to make room to unlimber the gun. The brigadier is upgraded from Dithering to Dependable, rolls a 4 which results in a 'Steady' command performance, receives a full move and is able to execute the maneuver.

The Prussians choose their infantry brigade, rated Dashing, receive a +1 for proximity of CiC and the result is also 'Steady' (one full move). They decide not to move.

Austrian Cuirassiers next, Independent Unit, Dependable, rolls a 'Steady' command performance, only slightly adjusts its position.

Prussians Dragoons next, Independent Unit, Dependable , also rolls a 'Steady' command performance, they stay where they are.

Final positions are shown in the picture above.

Firing Initiative: Prussians receive a +1 to their d6, roll a 4 +1 =5, Austrian roll a 5. The tie is rerolled, 3+1 = 4 versus 5, Austrians win.

Firing:

The Austrian gun is required to fire at its nearest target. In this case, as both enemy bataillons are equidistant, within 10 cm of each other and each at least half within the guns firing zone, the firing is aimed at both and hits are distributed equally or odd hits by dice roll.
Range is 41 cm, just 1 cm outside canister range! Effective range, superior artillery, moved (it unlimbered) -1 modifier, roll of 2 -1 results in no effect.
(By the way, in Honours of War, all rolls on the Firing Table are done using average dice)

The Prussian 12 pdr gun is normally required to fire at the enemy gun as its nearest target. But there is an exception: A target further away can be attacked if modifiers make this target easier to hit (Rulebook, page 26, Target Priorities). In this case, the Salm-Salm infantry is easier to hit then the gun (Difficult Target, -1 modifier) or the Cuirassiers (superior target, -1 modifier), so they are targeted. A roll of 3 -1 for long range is a 2 which results in a miss.

Now the 'Grazing Fire' rule kicks in (Rulepook, page 26). The ball bounces through Salm-Salm and hits Kaiser positioned behind it. In open terrain, if you roll a 3 to 6 on a d6, you may roll to hit this target too. Roll of 4, yes we are allowed to roll for a hit. Another 4, -1 for long range, -1 for superior target results in no effect

Tactical Commentary:

Have the Prussians committed a tactical blunder by not moving forward and pressing the attack?

They could then have concentrated their fire on the Salm-Salm infantry (in the picture above positioned to the right of the austrian gun) and be able to fire again or even charge the gun next turn.
Pushing forward the Dragoons may also have opened up an opportunity.

It seems that my fictional Generalmajor Meyernick was as confused as the historical one. As Chritopher Duffy writes on page 33 of  'By Force of Arms':

"Meyernick took up a good position with his flanks anchored on the Sebnitz and Kirnitzsch streams, but six rounds of cannon were enough to reduce him to panic and evoke the moral-inspiring cry of 'What shall we do now?' "

Tactical Challenge:

To the players who know the rules:  'What shall we do now?'

-  Engage in a firefight with the infantry, relying on your fire initiative?
-  Engage the Austrian Gun with infantry fire?
-  Charge the gun with the Dragoons  (and the Cuirassiers probably countercharging)
-  Engage the Austrian Cuirassiers with infantry fire?

The advantage of solo play: you get all the headaches.

Please tell me what you think.

Monday, February 22, 2016

Honours of War - St. Ulrich Solo Game - Part 1

Finally (!) I have enough painted figures at hand to play the scenario "The Combat of St. Ulrich" from the Honours of War ruleset:

The Combat of St. Ulrich (click picture to enlarge)

I decided on using the optional national differences for my Prussians and Austrians. The scenario section (page 58) tells you to keep the points ratio between the two forces equivalent to the numbers of units per side; in this case 5 to 4. Using the points system provided on page 52, the two forces are:

Austrians
Line Battalion, superior                       120 points
2 x Line Battalion, standard                 200 points
Cuirassier Regiment, superior             120 points
6 pdr Medium Artillery, superior          60 points
---------------------------------------------------------
Total                                                         500 points

Prussians
2 x Line Battalion, standard                 220 points
Dragoon Regiment, standard               110 points
12 pdr Heavy Artillery, standard           65 points
---------------------------------------------------------
Total                                                         395 points

Note that not only do the Austrians field one more Infantry Batallion, which on itself is enough to explain the points difference of 105 points, they also have 3 units of superior quality whereas the Prussians units are all standard.
The things the Prussians have going for them are higher mobility, potentially more reliable/agressive Brigade Commanders and higher Move Initiative and Fire Initiative (shown later).

All we need now is a little bit of evocative (albeit fictional) background to get us going:

In October 1756, after the Battle of Lobositz, Feldmarschall Maximilian Ulysses Graf von Browne has assembled a flying column to march to Pirna. The objective is to relieve the Saxon Army currently blockaded in camp by superior Prussian Forces.
The prussian Generalmajor Dietrich Reichard von Meyernick, who "had the reputation of an
Eisenfresser (man who chews on iron) as the governor of Berlin in peacetime" [Christopher Duffy, By Force of Arms, p. 33], has managed to intercept the austrian advance guard under Feldmarschalllieutenant Johann Sigismund Maquire Count von Inniskillin and taken up position near St. Ulrich to delay the Austrian force, intending to give them 'a bloody nose before retiring across the bridge'.


Before being ready for turn 1, one thing needs to be done: dicing for the rating of the two Commanders of the Infantry Brigades (including the respective Artillery): Dithering, Dependable or Dashing.

The Prussians roll a 5 and Oberst von Schlappstein is rated, in true prussian army spirit, as Dashing.
The Austrians roll a 2, Generalfeldwachtmeister von Krötendorf is rated as Dithering.

The setup for the scenario is shown in the picture above. Let us begin.

[Edit: The rules author, Keith Flint, clarified on the Honours of War Forum (post onn Feb29, titled : 'St. Ulrich scenario'): "See p.12, 'How Many Brigades and Independent Units'. This opening scenario was designed to have just 1 command figure on each side, who is both Commanding General and Brigade Commander at the same time." ]

Turn 1

1. Move Commanding Generals:  Both stay where they are for now. This is the only phase where the generals can be moved, so you need to anticipate where they may be needed.

2. Movement Initiative:  Attacker (Austrians) automatically has first turn initiative. Diced for later (d6 per player) with +1 modifier for the attacker and +1 for Prussians.

3. Movement Phase:  Alternating between players. First one side moves a brigade or independent unit, then the other side. Player with initiative decides who starts.

3a) Austrians decide to move with the Infantry brigade (includes the gun) first. Each brigade commander or independent unit has to dice for command performance using his/its rating, in this case Dithering. Now enter the commanding general. He, the mounted figure, as can be seen in the pictures, is positionend next to the brigadier (the figure on foot). If the commanding general is within 15 cm of a brigade commander or independent unit, the rating is increased one step, i.e. the brigadier counts as Dependable now.
A d6 roll of 5 results in a 'Steady' command performance, i.e. each brigade unit has one full move (execution shown in pictue below).

3b) Prussian decide to move with the Infantry brigade (includes the gun). Dashing brigadier with the commanding general nearby gives a +1 modifier. A roll of 2 +1 modifier results in a 3, i.e. also a 'Steady' command performance, one full move (execution shown in pictue below).

3c) Austrian Cuirassiers (independent unit). Dependable. Rolls a 4, 'Steady' command performance, one full move. Moves forward. Changes formation to line.

3d) Prussian Dragoons (independent unit). Dependable. Rolls a 3, 'Steady' command performance, one full move. Moves forward 20 cm and wheels to the left.


Situation after Turn 1 movement (click to enlarge)


 4. Firing Initiative & 5. Firing Phase: Only the prussian gun can fire. It must fire at the nearset target, the Salm-Salm Bataillon. A roll of 2 and a -1 modifier for long range results in no effect.

6. Melee Phase, 7. Rally Phase, 8. Check Army Breaking Points all do not apply.

Another view of the situation after Turn 1 movement (click to enlarge)

Are the Prussians able to use their superior mobility and fire initiative to obtain an early advantage? Can the austrian gun move into firing position quickly enough to be of any use? Will there be an early cavalry charge?

Things are about to heat up. Watch out for the next post.

Sunday, February 14, 2016

Dreimal Blau und dreimal des Teufels !

Triple blue, and three times damned to the devil ! That is what contemporaries said about the Frei-Infanterie regiments. "Triple blue" refers to the typical Frei-Infanterie uniform, dark blue coat, light blue facings, light blue waistcoat, as for the one shown here, Le Noble (click picture to enlarge):


On this picture they defend a small farm or village against a bunch of Croats (click picture to enlarge):


The image looks good in my oppinion. The interesting thing here is, the buildings are from the 15mm Flames of War range.
I shamelessly stole this idea from Keith Flint, author of the newly publishd "Honours of War" ruleset. See for example his blogpost "Villages and Towns in the SYW".

His ruleset is played with infantry bataillions of 20 figures and a 20 cm felt square can represent one village, as shown in the picture above.

I still have to paint a few more figures before being able to play a small scenario and able to show a complete table layout with troops. Watch this space.

Sunday, December 16, 2012

A Rare Victory

We met for battle in our ongoing war between Kingdom of Knobelland (tattergreis) and the Duchy of Rodenburg (Imperials, me).

The scenario was "Threat to a Flank" from the book "Scenario for all Ages" by Grant/Asquith. The rule used were Bill Protz' "Batailles de l´Ancien Regime" (BAR).

The basic idea is an attack across a river supported by a flank attack (click pictures to enlarge).


The Set-Up (Knobelland)

In the foreground are the forces of Knobelland. The flanking movement of two bataillons and a Hussar Squadron is visible on the right and already countered by a similar movement on the opposite side; all part of the scenario.


The view from my side of the table (Rodenburg)


As the enemy troops crossed the bridge, I deployed into firing line

I was reminded by my opponent to use the required marching drill to preserve the order of companies within the Bataillon. Company # 1 must always be on the right side of the Bataillon! Traditions must be honoured! 


... so it had to be done like this


By crossing the bridge, the enemy entered a real killing zone


The Cavalry also attacked (Norman Dragoons), but were repulsed


Finally, the enemy was forced to retreat across the bridge


Now it was time for the Knobelland main force to advance for an all-out attack
(viewed from Rodenburg side)


Heavy fighting ensued. The Altmark Artillery had exhausted its ammunition; no more Cannister rounds:


The Climax: Knobelland Grenadiers assault the hill;
staunchly defended by Grenzbataillon Plekzy-Gladz


The unbelievable happened: Plekzy-Gladz held its ground! The Grenadiers repulsed! They took to flight the Bataillons arranged behind them, total confusion reigned. The first Victory in Battle for the Duchy of Rodenburg!

A close game. Highly dramatic. The BAR rules worked well in the background. A great afternoon with a tough, gentlemanlike buddy. What more can you ask.

Sunday, March 25, 2012

Update

Is this true? The last Blog-Entry is dated 5th of April 2011, almost one year ago! Time for a short update:

We did a few games in the meantime. In September last year we actually did it and gamed the Old-School "Blasthof Bridge"-Scenario (see photos below). We haven´t used the the rules in "Charge" or the "The War Game" but opted for "Batailles de l'Ancien Régime", BAR in short. It was an entertaining game and we continiue to use these well-thought out rules.


First Contact: Hussars charge Light Infantry


The Result: A Bloody Nose for the Hussars!

Tuesday, April 5, 2011

Don's Prussian Brigade

My friend DonVoss has 'suddenly' painted (a habit he is famous for) three small bataillons of Prussian Infantry, 8 Hussars and one gun with crew.

The miniatures are from Crusader with the exception of the commander and the gun (Foundry). The Hussars, depicting H4 von Puttkamer Hussars, are a wild mix of Perry-Hussars, french officer-horses and converted plastic-horses. (click pictures to enlarge)


Don's Brigade in line


Infanterieregiment Nr. 25 von Kalckstein


Grenadiere


von Puttkamer Husaren (Nr.4), note the neatly painted sabretache


The line of battle, Infanterieregiment Nr. 16 Graf zu Dohna in the foreground


Within our gaming group, a small number of Austrian, French and Prussian bataillons, aproximatley ten in total, are now completed. Definetly not enough to play army level games. DonVoss sugested to use the "This very ground"-rules in the meantime. A good idea!